
It's Make it monday! time again.
Today like promised I'm showing you how to make another
Ipad/ tablet cover. This one is much easier than last weeks...
& no sewing!
I found this little beauty on the side link of youtube while watching how to make my last
ipad cover.
 You can click on image to head over to show me cute's blog .(Warning- she's got some
really cute stuff on her blog, so you'll be there for awhile.. you have been warned lol)
So Let's get started....
Ipad /Tablet Cover
Here's what ya'll need...
*a book (make sure it will fit your ipad/tablet with a little but not alot of room on the sides)
* fabric
*some stiff material like chipboard
*elastic
*any embellies if ya want to dress it up
Tools-
*modge podge ,paint brush, scissors, ruler, exacto knife
& away we go....
Step1: get your books... I made 5 at one time lol
Now for all you book lovers out there that are squeamish about destroying a book ( myself included)
I went to our dollar tree and bought books there that were not something I would ever read .
Take your exacto knife and carefully cut the seam where the last page meets the spine on both sides.
now you can tear out all those pages which is what I did with the first one... then realized it's much
easier to just pull the whole thing out at once... Duhhhh
Now you should have a book cover like these ones below
 Step 2: Now take your book cover and place it over fabric. Take a ruler & mark out 2 inches around the whole book. and cut out.
Now grab your modge podge and a paint brush. Brush the entire front of the book with modge podge.
Place your precut fabric over the book (Make sure you have it centered) & smooth it on.
You want to make sure there are no bubbles, that the fabric is flat, and make sure you indent your seams beside the spine, that way the book will open and close okay after dried.
Now set aside & let dry. this doesn't take long.
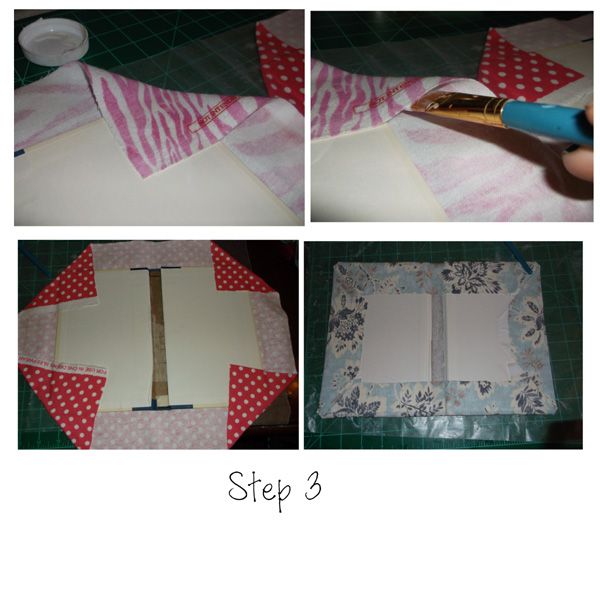
 Step3: now flip your book over. Take your modge podge and brush on at the corners in a pretty big area. Take the corners & fold down. Your edge is going to be right on the book edge so it makes
a triangle.
Take some modge podge and paint into those sticking up corners, & smooth down so they hold.
after all 4 corners are done. you want to work on the sides.
you can modge podge on the material or the book whichever one is your preference. Just make sure you secure your fabric all down. Modge podging the corners first gives you a clean corner.
step4: Time to make the holder part of your cover. Measure your ipad/ tablet and draw out onto chipboard or outher stiff material. Becuase I couldn't get to hobby lobby. I bought some dry erease
kids learning to write things at the dollar tree... and I could fit 2 on 1.. So bonus!
Cut it out using scissors or exacto knife.
 Step5: Now measure the inside of your book about halfway over the 2nd page (Becuase
part of it is already covered you don't need it to go side to side, just enough to cover up the parts you already modge podged down) & from the bottom to the top of where you modge podged.
now modge podge the wrong side of the fabric and carefully place it over the exposed parts on
the inside of the book. Making sure you get all the bubbles out & it can open and close okay.
Now take your precut chipboard & place over fabric.Measure 1 inch around edges & cut out. Modge podge & place the fabric in the center.
Using the same process as the book you are going to modge podge the edges to the back starting with the corners.
 Step6: You are gonna need some elastic. I cut up those long elastic headbands that they sale everywhere right now. Measure one out so that you have enough to glue to back and goes over the corners. cut out 4. Hot glue to the back of the covered chipboard making sure it is where it needs to be to hold your ipad/tablet.
Now Here is where it gets tricky. I hot glued my chipboard to the book like show me cute did. Its not that sturdy. I noticed the hot glue dries in places before you can place your chipboard . So I have been looking at outher methods, and saw that book binding glue may be the best bet. or maybe like E-6000. If you have any suggestions let me know!
Anyways you are going to glue your chipboard to the EDGE of the right hand side of the book, on the inside. The first one I did I clued it to the center of the right side of the book and it makes it hard to close... lesson learned lol.
 & there ya have it a Diy ipad/tablet cover for relatively cheap. I bought 1/2 yr material (mine was $3.97 a yard) a book for a buck , chipboard for 50 cents a book, and elastic,& modge podge I already had...
So total cost $3.50
Now you can also accessorize the outside if ya want. I wanted tinkerbell on my cheveron material.
so I traced a silhouette of her,cut it out, & traced it on one of those black pants mending patches...
& ironed it on! I love these! I can switch them out when I feel like it. they were easy to make & fun.
 If you have an idea you want to share with me or a question , please feel free to leave me a comment.
 Next week I will share how to accessorize your cord & how to make interchangeable back covers for your ipad
Happy Scrappin Ya'All!
until next time...


Today like promised I'm showing you how to make another
Ipad/ tablet cover. This one is much easier than last weeks...
& no sewing!
I found this little beauty on the side link of youtube while watching how to make my last
ipad cover.
really cute stuff on her blog, so you'll be there for awhile.. you have been warned lol)
So Let's get started....
Ipad /Tablet Cover
Here's what ya'll need...
*a book (make sure it will fit your ipad/tablet with a little but not alot of room on the sides)
* fabric
*some stiff material like chipboard
*elastic
*any embellies if ya want to dress it up
Tools-
*modge podge ,paint brush, scissors, ruler, exacto knife
& away we go....
Step1: get your books... I made 5 at one time lol
Now for all you book lovers out there that are squeamish about destroying a book ( myself included)
I went to our dollar tree and bought books there that were not something I would ever read .
Take your exacto knife and carefully cut the seam where the last page meets the spine on both sides.
now you can tear out all those pages which is what I did with the first one... then realized it's much
easier to just pull the whole thing out at once... Duhhhh
Now you should have a book cover like these ones below
Now grab your modge podge and a paint brush. Brush the entire front of the book with modge podge.
Place your precut fabric over the book (Make sure you have it centered) & smooth it on.
You want to make sure there are no bubbles, that the fabric is flat, and make sure you indent your seams beside the spine, that way the book will open and close okay after dried.
Now set aside & let dry. this doesn't take long.
a triangle.
Take some modge podge and paint into those sticking up corners, & smooth down so they hold.
after all 4 corners are done. you want to work on the sides.
you can modge podge on the material or the book whichever one is your preference. Just make sure you secure your fabric all down. Modge podging the corners first gives you a clean corner.
step4: Time to make the holder part of your cover. Measure your ipad/ tablet and draw out onto chipboard or outher stiff material. Becuase I couldn't get to hobby lobby. I bought some dry erease
kids learning to write things at the dollar tree... and I could fit 2 on 1.. So bonus!
Cut it out using scissors or exacto knife.
part of it is already covered you don't need it to go side to side, just enough to cover up the parts you already modge podged down) & from the bottom to the top of where you modge podged.
now modge podge the wrong side of the fabric and carefully place it over the exposed parts on
the inside of the book. Making sure you get all the bubbles out & it can open and close okay.
Now take your precut chipboard & place over fabric.Measure 1 inch around edges & cut out. Modge podge & place the fabric in the center.
Using the same process as the book you are going to modge podge the edges to the back starting with the corners.
Now Here is where it gets tricky. I hot glued my chipboard to the book like show me cute did. Its not that sturdy. I noticed the hot glue dries in places before you can place your chipboard . So I have been looking at outher methods, and saw that book binding glue may be the best bet. or maybe like E-6000. If you have any suggestions let me know!
Anyways you are going to glue your chipboard to the EDGE of the right hand side of the book, on the inside. The first one I did I clued it to the center of the right side of the book and it makes it hard to close... lesson learned lol.
So total cost $3.50
Now you can also accessorize the outside if ya want. I wanted tinkerbell on my cheveron material.
so I traced a silhouette of her,cut it out, & traced it on one of those black pants mending patches...
& ironed it on! I love these! I can switch them out when I feel like it. they were easy to make & fun.
Happy Scrappin Ya'All!
until next time...
No comments:
Post a Comment