
It's Make it Monday time!
I know I know , Im a day late... AGAIN. lol
Yesterday I had to work in the day instead of eveening .. and then it was just a horrible day...
So we will pretend.. it's monday lol.
For Christmas I got an Ipad mini! YEAH!
So the first thing I thought is I need a case/cover for it.
I did some searches and found some cute disney ones... but they were all so expensive.
So I thought well I can make one. I did a google search for DIY ipad covers and went to youtube.
I found one I really wanted to try. I like the look of the one I made but it seems a little big so I may have to make more and size it down a bit. While doing my reasearch I also found a different
type of ipad cover ..so yes I made that one too (Well truth be told I made 5 of those ones)
Hey a girl's gotta accesorize with her moods lol) So my make it monday for next week will be ipad cover #2....
Here we go.
Since it is a video I can't post a image but you can go HERE to see
the original video.
So Materials.. you will need:
*material ( I had 1/2 yard but did not use it all)
*some hard material like chipboard (I bought a paper binder and cut it up, you dont want to use cardboard it bends too easy)
*thread
*elastic
Tools: sewing machine, needle, ruler, scissors
To Make
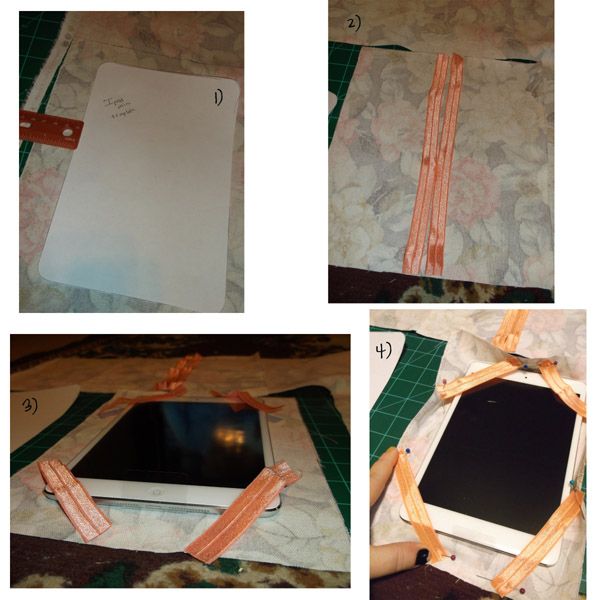
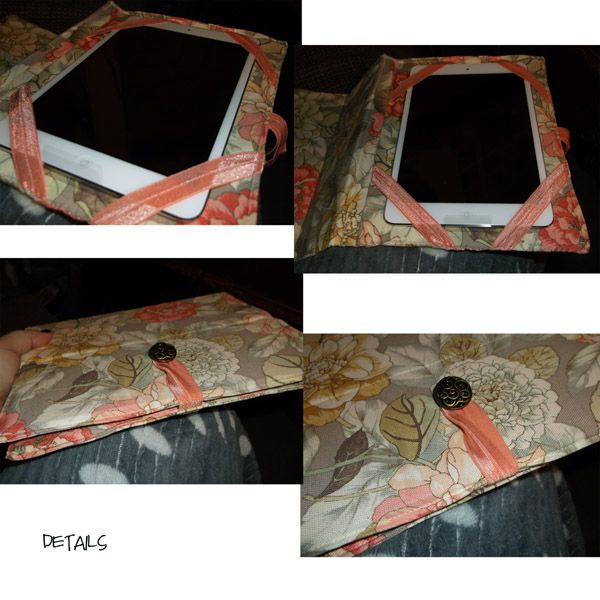
The first thing I did was trace my ipad so I had a template.
1)You are going to cut one piece of material the size of your ipad plus 1cm around so use your ruler and mark your material & cut. (I made it an inch around & it was to big).
Now place that peice on fabric and add about an inch to the longways down side. ( this is for the middle big enough for the thickness of your ipad to figure out how big to make it place the piad/tablet on it and keep about 1cm on each side). cut that out.
2)The video showed using a wide elastic and a thinnner one.. but I only had one size. So you want to cut one of each ( or 2 of same kind) the length of your cut material.
3) now you are going to need to cut 4 peices of elastic to be your holders. place your ipad on material on center and decide how long the elastic needs to be...cut 4
4) now pin these 4 elastics in place. Make sure that it doesnt cover anything important on your ipad/tablet.
(NOTE: I also wanted a closure so I cut enough elastic to make a loop and sewed it in the middle side of elastic side... making a loop with the elastic)
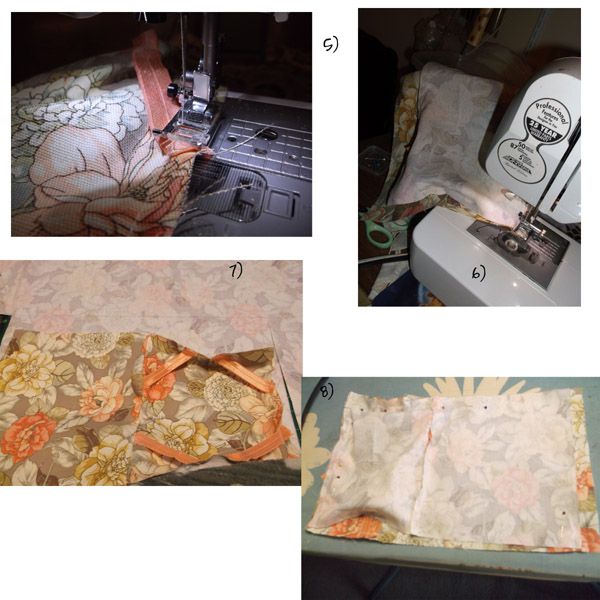
 5) Now sew those elastic pieces in place.
6)Sew the 2 pieces of your material together right sides facing each other.
7)Now take your 2 sewn together peices & lay it on the rest of your fabric & cut out a peice the size
of the sewn peice.
Take those 2 long pieces of elastic you previously cut & attach one directly in the middle of the right side of material that would be on the back of the 4 elastic piece of material (So if you were to put the front & back together & fold over where the seem was, you would place the elastic in the middle of this.) Take the 2nd piece and place it close by the 1st on the end side. Sew a straight stitch to attach the fabric and elastic together.
8) place the front & back right side material together & pin so you can can sew together.( not the 4 elastic piece is a little difficult to deal with so just make sure your material edges are together & know that it wont sit flat lol). Now sew a straight stitch around the side , top & other side. Leaving the bottom open.
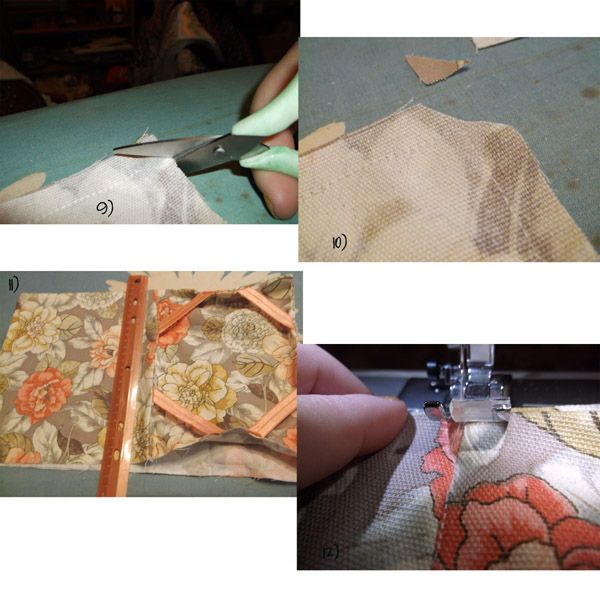
 9&10) Now take your sewn material & cut the 2 corners at an angle ( this makes it easier to get nice edges)
11) pull your material rightside out, & straighten your edges including those corners. Take your iron & go over the edges to make sure they stay in place. careful where the elastic is not to melt it. Also fold up the bottom to make an aprox. 1/4 seem and iron this. it will help when you are closing the bottom.
*Remember that elastic loop you made earlier.. well you need something for it to loop to! I got a button & putting the sides together decided where the button needed to be , & hand sewed it in place.
12) now sew a straight stitch as close to the already sewn seem as you can get, all the way to the bottom.


I know I know , Im a day late... AGAIN. lol
Yesterday I had to work in the day instead of eveening .. and then it was just a horrible day...
So we will pretend.. it's monday lol.
For Christmas I got an Ipad mini! YEAH!
So the first thing I thought is I need a case/cover for it.
I did some searches and found some cute disney ones... but they were all so expensive.
So I thought well I can make one. I did a google search for DIY ipad covers and went to youtube.
I found one I really wanted to try. I like the look of the one I made but it seems a little big so I may have to make more and size it down a bit. While doing my reasearch I also found a different
type of ipad cover ..so yes I made that one too (Well truth be told I made 5 of those ones)
Hey a girl's gotta accesorize with her moods lol) So my make it monday for next week will be ipad cover #2....
Here we go.
Since it is a video I can't post a image but you can go HERE to see
the original video.
So Materials.. you will need:
*material ( I had 1/2 yard but did not use it all)
*some hard material like chipboard (I bought a paper binder and cut it up, you dont want to use cardboard it bends too easy)
*thread
*elastic
Tools: sewing machine, needle, ruler, scissors
To Make
The first thing I did was trace my ipad so I had a template.
1)You are going to cut one piece of material the size of your ipad plus 1cm around so use your ruler and mark your material & cut. (I made it an inch around & it was to big).
Now place that peice on fabric and add about an inch to the longways down side. ( this is for the middle big enough for the thickness of your ipad to figure out how big to make it place the piad/tablet on it and keep about 1cm on each side). cut that out.
2)The video showed using a wide elastic and a thinnner one.. but I only had one size. So you want to cut one of each ( or 2 of same kind) the length of your cut material.
3) now you are going to need to cut 4 peices of elastic to be your holders. place your ipad on material on center and decide how long the elastic needs to be...cut 4
4) now pin these 4 elastics in place. Make sure that it doesnt cover anything important on your ipad/tablet.
(NOTE: I also wanted a closure so I cut enough elastic to make a loop and sewed it in the middle side of elastic side... making a loop with the elastic)
6)Sew the 2 pieces of your material together right sides facing each other.
7)Now take your 2 sewn together peices & lay it on the rest of your fabric & cut out a peice the size
of the sewn peice.
Take those 2 long pieces of elastic you previously cut & attach one directly in the middle of the right side of material that would be on the back of the 4 elastic piece of material (So if you were to put the front & back together & fold over where the seem was, you would place the elastic in the middle of this.) Take the 2nd piece and place it close by the 1st on the end side. Sew a straight stitch to attach the fabric and elastic together.
8) place the front & back right side material together & pin so you can can sew together.( not the 4 elastic piece is a little difficult to deal with so just make sure your material edges are together & know that it wont sit flat lol). Now sew a straight stitch around the side , top & other side. Leaving the bottom open.
11) pull your material rightside out, & straighten your edges including those corners. Take your iron & go over the edges to make sure they stay in place. careful where the elastic is not to melt it. Also fold up the bottom to make an aprox. 1/4 seem and iron this. it will help when you are closing the bottom.
*Remember that elastic loop you made earlier.. well you need something for it to loop to! I got a button & putting the sides together decided where the button needed to be , & hand sewed it in place.
12) now sew a straight stitch as close to the already sewn seem as you can get, all the way to the bottom.
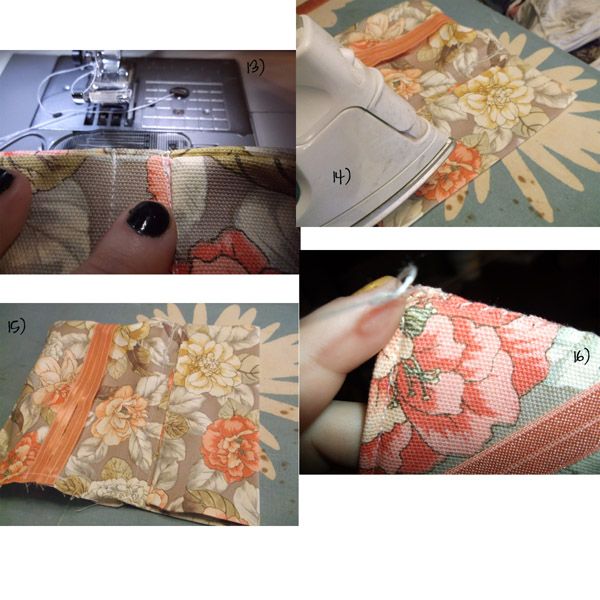
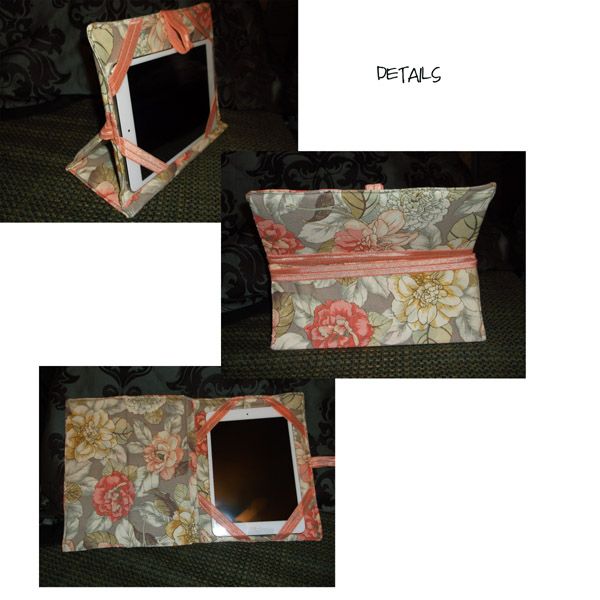
13)Take your material and fold in in half. mark it with chalk & sew down that seam (see the diagram for #13 thats what it should look like.) this will be your spine. take your non elastic side and fold it to the seam you just made & mark & sew down it (You should now have 3 seams down the cover)
14)Iron it out so its smooth( Remember to avoid the elastic)
15)Now you are going to measure you openings. Take a ruler and measure and write down measurements. you will have 1 big one for the actual ipad/tablet, 1 skinny one for spine,1 for right side , & 1 for left side of flat side... 4 in all.
remember that hard material you had... now your gonna cut these measurements out of those.these will go inserted in your openings so you may want to cut them a smidge smaller, so they fit okay.
(*NOTE- I sewed a straight stitch around sides and top close to edge but in hindsight I shouldn't have. I thought it would give it a better finish but I don't like how it turned out.. so next one... no straight stitch around)
Insert those bad boys in.
16)Take some needle & thread & sew your bottom closed. I found it easiest to sew it if you ironed a seam way up in the first steps.
Now your done. place your ipad/ Tablet in it's elastic holders and voila!
as you can see mine is a little bigger than I wanted but hey it was a first try. now I can remod & fix it on my next one.
Did you wonder what those long pieces of elastic were for, and those 2 sections on flat side... they are for your stand.just fold it and place the edge into your elastic. That is why you needed one wider one. since I didn't have wide and thinner, I just used two. Originally the skinnier one is supposed to be a holder to close your book, just take it and flip it around holding the 2 sides together.. I used my button method since I really liked the button... and I only had 2 skinnier pieces of elastic (by the way since those elastic hair ties are really popular right now they have all sorts of colored and designed elastic I got mine from my walmart in the crafting section for jewerly)
So this is one of the types of ipad covers I made , This one is the harder of the two, & I really prefer the next one, Its alot easier, & I like the design better.. so come back next week to see how to make that one!
If you have any questions or comments please feel free to leave me some.
Thanks for looking..
Happy Craftin Ya'All!
until next time....
No comments:
Post a Comment