Monday, March 31, 2014

Make it monday: Vinyl flower Hair clip

Make it Monday time again!
Awhile ago I was in hobby lobby and as I was going by the already made flower clips I saw a really cute
vinyl/pleather type of flower clip. I just kept thinking of that flower. I admit to being a tad obsessed sometimes. So later I decided I would give it a try.
I used a technique I use to make the satin singed edge flowers.

Sorry girls I tried to find a picture of the same type of clip and just couldn't find one.

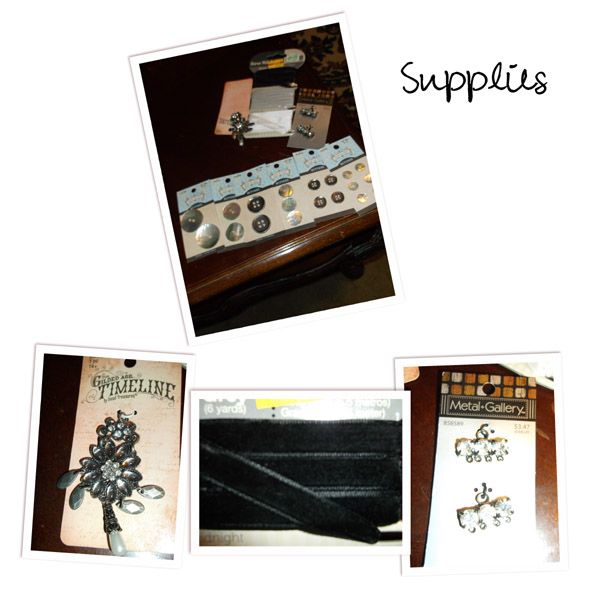
So first things first... gather up your supplies:
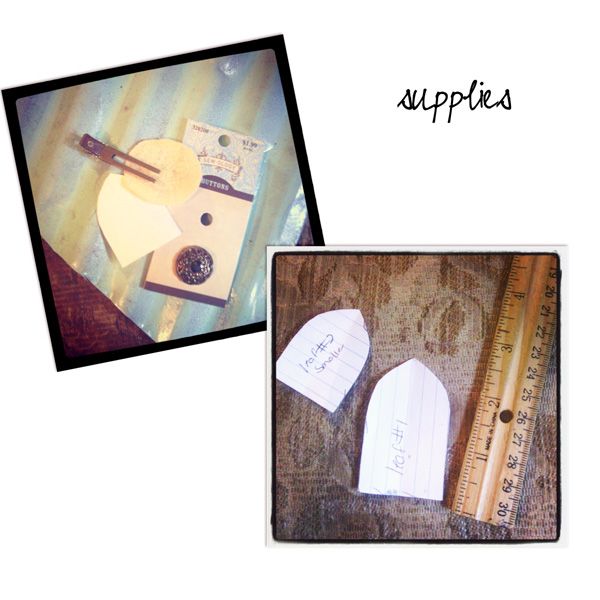
You will need:
*fabric (pleather for these ones or you can use any outher fabric, as you will see on the bottom the fabric makes it have a different look)
*a button or something for center
*some felt
* a hair clip (HINT: I got a huge box of these at sallys for fairly cheap.... and they work better)
*tools: glue gun, needle & thread, and template

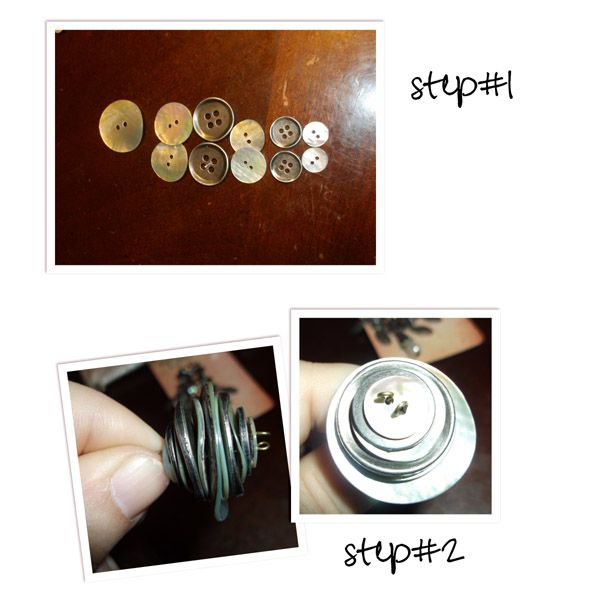
I designed my own template but its not that hard. you will need two sizes- one big and one smaller. I made my big one first, then cut out another one, and just cut it down a bit.
For my flower I cut out 8 large size & 6 small size, you could probably do 7&5 out of the vinyl (or fabric)
When you have all of them cut then all you have to do is get your needle and thread. Tie a knot at the end .
then just start weaving the needle and thread through the bottom part of the flower, when you get to the end grab the next flower petal and continue until all the same size petals are connected. Take the string and pull until all the petals come together in a circle shape, Tie together. then do the same for the top section.
Now what you will want to do is put the bigger section on the bottom, and the small section on the top.
Taking your needle and thread, sew the two pieces together. Now depending on what you are wanting in your middle, you will sew it on or glue it with your hot glue gun.
Voila- flower is finished!
Now that your flower is complete flip that bad boy over. 
Take your felt and cut a circle (enough to cover up the hole in the middle & a little extra) & a piece rectangle (enough to cover up the clip piece and attach to
to the outher felt.)
Glue the circle part of the felt to the flower. Wait a second and let it dry.
Here's what I do to attach the clip, you may find an easier way. I take and put glue up and down the felt and
place the clip on it with it open (DO NOT let it close or it will glue closed)
I grab the glue gun and run some glue over the part of the clip thats on the felt, and quickly place the rectangle peice of felt over it and let the clip down.....

& thats it... See not so hard!
These take very minimal amounts of fabric and can be made so many different ways.
As you can see there is a vast difference in the look using different fabrics.
For the bottom flower I made it exactly the same way, the only difference is
that on the satin, I used the singed flower technique around the edges.
If you make one please comment below with a linkie! I'd love to see it!
Happy Crafting Ya'All!


Friday, March 28, 2014

Wendy Tunison Designs has a new template set out... Temptations vol.28

I've got a fun new set of templates from Wendy Tunison Designs to show you today that is perfect for anyone doing P52/P365, etc.  I don't know about you but Wendy struggles with the pocket style so she's been trying to create a more fun version of templates each month for her albums.  Temptations Vol. 28 is 30% off through April 2nd.
Wt_T28 copy
You're going to love what our CT did with this set!
T28as
T28bs
T28cs

I've also put Just Us {April} on sale this week for 50% off!
JU4_327
Be sure to stop by the Super Saturday Sale this week to pick up these three kits from Wendy for just $2.00 each!
Ss_3_29_14
There are also a few more days to play along with the Little Warrior Challenge on Wendy's FB Fan Page!
LWContest

And here's a little freebie for you!
you can find it right HERE!
 

Have a great day!

Tuesday, March 25, 2014

Friends forever , A new release from Magical scraps galore

Tell the special women in your life just how much you love them with this beautiful new collection by Magical Scraps Galore, Friends Forever. With its soft color palette and sweet embellishments, this kit celebrates the joy of friendship and is also perfect to scrap all your feminine layouts, such as weddings, mother's day, babies, and more!

 This kit includes 1 full uppercase alpha with numbers and punctuation, 30 papers (5 glitter sheets, 5 cardstocks, 5 grunge papers and 15 unique patterns) and 57 unique elements.

Friends Forever is available at my Scraps N Pieces store, and is 30% off through April 2nd.


Important: This collection was part of the March Fix at DigiScrapAddicts, so please check your stash before buying.


Some beautiful layouts created with Forever Friends:


Here's a beautiful cluster freebie created specially for you by Karrie:


You can find my freebie right HERE!

Thank you and have a great day!


Monday, March 24, 2014

fabulous you a new release from Ponytails designs

Fabulous You is all about telling the world how fabulous YOU are for a change. We spend so much time making pages about children, spouses, and friends that we forget to tell our own stories. Toot your own horn for a change and let the world see how awesome you really are! Fabulous You, the kit created for the March edition of The Fix, is now available for purchase! Pick it up this week for 30% off. ponytails_fabulous_preview ponytails_fabulous_papers ponytails_fabulous_alpha buy gingerscraps 300pxbuy scraps n pieces 300px   ponytails_fabulousyou_prev1 ponytails_fabulousyou_prev2 


testing new layout for blog

Testing my new layout for my blog
Made using:
Wendy tunison Designs- Just us april
Magical scraps galore- best friends
Mad for the mouse designs- down the garden path
pixie far and way- studio Ellie

Make it monday: stacked button necklace... vintageified!

Okay I know I have said it before but I LOVE all things vintage.. especially jewerly!!!
I was on pintrest one day and came across some stacked button necklace. It was so dang cute and looked like it would be easy to try... so I tries! & I was delighted with the results.. seriously I have seen some of those pintrest fail posts and did not want to end up like that lol.
Here is some pictures of the necklaces...
Absolutely Yummy .. Right?!? 
You can find these HERE. This is an etsy site so these are for sale ... no tutorial .

Okay so I looked at these and thought hey I could make that!

Here's what you need:
*Buttons
*some sort of chain ( I used velvet ribbon, they used satin ribbon.. you decide what you want to do.. it's your necklace and your style!)
*charm or charms to hang at bottom
*jumprings
*eye pin
*tools- needle nose pliers, clippers, the rounded tip pliers

I wanted to make my necklace vintagey looking so I used shell buttons and some silver ones. I used velevet ribbon for the chain, I used fancy rhinestone encrested clasp type things for top, and a really neat vintagey charm from the timeline collection at hobby lobby. Seriously hobby lobby has 50% off sales all the time just keep a look out. That place is like a crafters heaven.. if you don't have a hobby lobby near you... you have my sincere condoleneces!
Okay first step is rearrange your buttons how you want them. I used one really big shell button for the middle. Then I used 2 large shell buttons next , then 2 large silver buttons, then 2 medium shell buttons, 2 medium silver buttons and ended with 2 small shell buttons. ( I found out the hard way that they shell buttons are very fragile.. luckily the one that broke had 4 in the pack... be careful with them)
Step #2 After you get them sorted how you want them, grab a eye pin and start putting your bottons on. I ended up using two to make it more sturdy, I just put the eye pin through the opposite side of the holes.
when they are all threaded through take your eye pin and use the rounded end pliers to make a loop, nipping the excess off. (if you have not done this before .. be prepared to get frustrated it takes some time to learn how to do it correctly.. I will admit to cursing it to a pit of endless darkness several times)
Step #3. I used two jump rings to attach my rhinestone clap thingy (sorry I know thats not the technical word but I have no clue what it's called) to the top of my stacked buttons. 
Step #4. Attatch your charm or charms to the bottom of the stacked buttons with another jumpring.
Step #5. I put the velvet around my neck and saw where I wanted my necklace to hang and cut. then I sewed the two ends together with my sewing maching. I then attached that to the clapy things with another jumpring.... 
& VOILA! Your done. Its pretty easy craft to do and I loved the end result... Now to wear this bad boy !

If you make or have made one of these I would LOVE to see it, or if you have any questions, just leave me a comment down below :)
Happy Crafting Ya'All!


Sunday, March 23, 2014

Take a trip ... down the garden path, a new release from Mad for the mouse designs

Spring is in the air..


at least for some of us it is. I'd venture spring a little ways from me, since we just got 10 more inches of that powdery white stuff today.  Hoping your part of the country is a little bit warmer.

Any time of year is a good time to visit Disney... but some times of year has it's advantages.  With all the different events they offer, you could go at least 4 times a year and still have a different experience each time!! That was my Disney plug.

One of my favorite times to go is during the Flower & Garden Festival, the flowers, the topiaries, and now they have added certain food kiosks too! This kit will help you preserve those special memories!! It's perfect for the festival in general, and for the fairy garden, and many other things, come check it out! You can find this kit at Mad for the Mouse Designs.

Hope you like it!!! Stop by and say Hi!!


2 of the Mad for the Mouse ladies are currently hosting challenges over at MouseScrappers!  Jenny is hosting a template challenge HERE, the end date is 3/28.

Charlene is hosting a Scraplift Challenge HERE, you can read all about it there! The end date is 3/29! So come join us and have some fun!

The Girls have some freebies for you to match this lovely kit, make sure you pick them up!
Michelle has something on her blog. You can find more goodies at Jenny's blog, and Charlene has something special for you too!

Happy Scrapping Ya'all!